| “A
new owner of a shallow water sailboat should avoid making any major modifications
to his vessel for the first year of ownership.” Peter Duff, builder of the Dovekie |
| The following
modifications and projects for various SWS and HenNest boats were submitted
by their owners and were deemed by them to be tried and true improvements.
These ideas are the products of the ingenuity of each individual boat's owner
or a former owner unless otherwise noted. |
8.1 Builder Modifications to Basic Boat
|
Here are some modifications
completed at SWS boat builder:.
a. DOVEKIES prior to #31 had laminated mahogany leeboards. b. DOVEKIES between #31 and #85 had narrow fiberglass leeboards. After # 85 they were equipped with the current wider fiberglass leeboards. c. DOVEKIES prior to #42 had a stainless steel gallows. d. DOVEKIES prior to #62 had a straight helmsman’s seat across the aft end of the cockpit instead of the current horseshoe shaped “crew seat”. e. DOVEKIES after #59 are equipped with a Jiffy reefing system which replaced the original double maststep system. (One on the deck and one on the cabin sole). f. DOVEKIES prior to #77 had a different deck with smaller deck hatches, raised combings, and only canvas covers. g. DOVEKIES after #84 are equipped with the current larger sail. (143 sq/ft. vs. 128 sq/ft.) h. DOVEKIES after #75 are equipped with a bow centerboard. i. DOVEKIES after #145 are equipped with Beckson opening oarports with rubber gaskets and screens. j. DOVEKIES after #135 are equipped with an aluminum mast and sprit. k. DOVEKIES after #150 have colored Gelcoat topsides instead of Awl-Grip or Sterling paint. The above information represents how the boats were delivered, and is as accurate as we can determine. Many older DOVEKIES have been upgraded, and the only way to know the present state of any boat for sure, is to contact the current owner. With the exception of replacing the stainless steel gallows with a fiberglass one, all of the above equipment can be retrofitted to any of the older boats. |
8.2 Owner Modifications to Basic Boat
|
Here are some modification ideas that
Hen owners have accomplished on their own.
As with all trailerable sailboats hauling a mast and the spars that go with it can be a pain. I trailered a Marsh Hen for years with no organized way to haul that long mast and sprit around other than plopping life cushions down where the mast and sprit lay on the deck and tying them down. Invariably when I arrived at the ramp I would spend 10 minutes getting all of the tie downs off and then proceed to step the mast at which point the sprit would fall from the boat to the concrete. I would then have to climb down from the boat and lay the sprit back on deck and climb back on the boat at which point the sprit would again fall off the boat and on to the concrete. After years of doing this, I figured I needed a way to keep this from happening. I bought two 4 inch pvc caps and cut a slot and hole that slid tightly over the fore and aft cleats mounted on the decks. I cut out fittings for the mast and sprit to "cradle" in and bolted them to the pvc caps which are flat on top. The wood cutouts look kind of like moose ears and work great. They protect the spars, keep them in place and are very easy to put on, take off and store while underway. I wish I could take credit for the invention but it is very similar to the system that the Sea Pearl 21 uses to carry its main and mizzen mast while being trailered. – Allen Other than replacing my original sprit sail rig with a Bay Hen gaff rig, the only modification I've made to my Marsh Hen is to make a boom crutch and holder to keep the boom and sail out of my way while motoring. The traditional way to hold the boom and sail while motoring, is to incorporate a boom gallows mounted at the stern of the boat. This is a standard item that comes with the gaff rigged hens, but since my boat originally had a sprit rig none was included. Upon converting to the gaff rig, my first thought was to install a boom gallows similar to the other hens, but not liking the permanent nature of the gallows, decided to adapt the "mast crutch" concept used successfully on Cape Cod type cat boats. It took considerable trial and experimentation to locate the most appropriate spot for the crutch and holder. The difficulty arose because the stern of the Marsh Hen is pointed and there is no transom to mount such an item. I did not wish to cut a hole in the deck and the rudder and tiller always presented interference. Success was accomplished by discovering that I could attach a 16" length of 1 1/2" inside diameter pvc pipe directly to the motor mount that was fastened to the port quarter of my boat - canoe fashion. By planning carefully, I was able to mount the pipe where it doesn't interfere with the operation of tiller, rudder, outboard, or sail, and the pvc was painted the same color as the boat hull and is barely visible. Since the pipe is fastened directly to the motor mount, there was no need to drill holes or make alterations to the boat itself! I found a paddle, cut a notch in it's blade (cushioned the cutout with rubber material) to hold the boom, sawed the paddle shaft to length, inverted and inserted it into the pvc holder. It works very well, keeping the boom and sail out of my face while motoring, and when I am ready to sail, I simply remove the crutch (paddle) and stow it. After sailing, I replace the crutch in it's holder for motoring and mooring. -- Herm Lacing: I have Marsh Hen #22 now (Toby's boat) and have tried lacing both ways--I like skipping a turn or two better--I can hoist and douse with very little problem. I wish the bottom two grommets were not below the snotter, but, other than that, it works well. -- Jim Mast Track: My MH # 16 has a sail track that was installed by the previous owner and it works fantastic! It is the only modification that my Hen has to it and is wonderful compared to laced on sails and hoops that don't work. The sail track is stainless and is screwed to the mast at many different points on the mast. The sail has sail slides that "straddle" the sail track and are attached to the sail by the many grommets previously used for lacing the sail on. Shackles are used to attach the slides to the sail and a small vinyl protective cover is used to protect the sail. – Allen Mast Hoops: I replaced the sail lacing with 4-1/2" inside diameter pvc hoops when I converted my Marsh Hen sprit to the gaff rig. I have only used hoops for one season, but they have worked very well, so far. Easy up and down with no binding. I don't think I would want to go back to a lacing arrangement. I heard that others have problems with their hoops and I can't explain why mine work well and theirs bind. One thing I can report is that my arrangement employs eleven (11) hoops (each one a foot apart) which I at first thought was overkill, but I have discovered they do keep the luff straight and, since there is so little sailcloth between each hoop, that possibly could contribute to the smoothness of operation on my mast. -- Herm Sleeping under the Bay Hen's Bimini-tent has some great advantages. One is being able to unzip part of the tent in early morning to look out at a great blue heron feeding along the shore. Now this is without having to get out of your sleeping bag or even raise your head off the pillow! To convert the cockpit to a bunk, I chose to use 3/8" plywood painted white. (Reuben Trane used ¾” teak planks with cleats holding them together, probably much stronger.) Two inserts were made that span the footwell of the cockpit. When both are in place they fill about two thirds of the footwell. I did not fill in the aft part near the engine. I find I don't need to and its nice to sit up and still have a place for legs. A length of teak is attached with nuts and bolts onto each of the two cockpit lids. The teak is 3/8” by 1/4” and is positioned 3/8" below the lid top. Care must be taken to assure the nuts on the inside of the lid will not rub the footwell wall. The teak support runs most of the length of the lid. The two white boards are strong enough for careful use, but I wouldn't jump up and down on them. I've thought of adding stiffeners to their undersides, but really have not needed them. Their dimensions are such that they stand on edge inside one of the cockpit storage bins. I had two cushions especially made for the cockpit bunk. A large one that has two pieces of foam that supports most of my body and a smaller one that slips between engine and backrest, that supports my legs and feet. Half of the large cushion can be lifted and the cushion pushed to one side, making both a seat and back rest combo. The whole arrangement works very nicely except for one thing. The engine does get in the way of your feet so you can't spread out too much. Next engine will be a 2 horse Honda that I'll take out of the well and really spread out! – Ken Several Bay Hen sailors have suffered mast breakage. The break is caused by the development of stress corrosion cracks at the hinge boltholes where the mast is attached to the tabernacle. It is at this area where the greatest stress occurs. Since these holes are hidden from view it would be a good idea to periodically remove the hinge bolt and make a careful inspection. If you see hairline cracks beginning at the boltholes, it will not be too long before they grow to the point where the mast will break. If you see stress cracks, refer to the first option below that strengthens the bolt hole area and removes the stress cracks. If the mast brakes there have been two approaches two approaches we are aware of: either adding stays or simply replacing the mast. All three approaches are covered below: Repairing a mast with stress cracks - Before describing my mast repair, I must insist that I cannot confirm it to be the best solution for the reoccurring problem of upper mast hole fatigue. It's simply what my man at the machine shop and I came up with as a possible solution. Time will tell, if this solution works. Inspection at the beginning of the season showed no apparent fatigue, but after lowering my mast this October, it was apparent that stress cracks had begun to fracture the mast. They were thin, approximately half inch long, fissures radiating outwards from the upper holes. You had to look closely to see them, but they were clearly there. Our approach was to mill an 18" length of thick walled, aluminum tubing (approx. 1/4" thickness) to snugly fit the inside diameter of the mast. It was decided NOT to weld the two tubes together at any point because we felt it best to allow for some movement between the two tubes with the through-bolt securing the inside tube in position. This may have been a good or a bad decision, but not being an engineer, I must wait for time to give the final verdict. The suggestion of welding the tubes together at the base seems to have merit, but presently, only friction between the tubes and the pivot bolt keeps the tubes in alignment on my Bay Hen mast. After the cracks on the mast had been ground and filled with weld, a new hole was drilled through both tubes to receive the "hinge" bolt. Of course holes were also drilled to receive the lower pin (or bolt) which secures the mast in the upright position. That pretty much tells the story, and I'm hopeful that it will prove to be a viable solution. Total cost for labor and materials was $84.00. - Herm Adding Stays - We attached the stays about 20 inches from the top of the mast. The forestay is attached to the bow with a quick release hook. The side stays or shrouds are 10 inches back from the mast (56” from the bow) and remain attached all the time. They do have adjustments (turnbuckles) so that they are not tight when the mast is vertical and under no strain. The forestay is taut when it is initially secured. Stays are attached to the edge of the deck where it overhangs the hull. A small amount of teak trim was removed to accommodate the fittings. We unfasten the forestay when we drop the mast and bundle up the side stays with all of the other stuff when we lower the mast into the boom cradle. It works for us. Before installing the stays the mast broke twice. Since the fix, no further problems as of this date. It cost $800 to have the work done in an Annapolis mast and rigging shop. This work also included the repair and reinforcement of the mast. The mast was rewelded using heavy aluminum welds and vertical aluminum bands welded on where the hinge attaches to the tabernacle. We have also had to reweld and reinforce the gallows where the vertical pipes are attached to the metal plates used to fix the gallows to the stern deck. I think the welder called them gussets. Driving down the road causes whole thing to move side to side and eventually caused the welds to break. Also we put a second notch on the gallows’ cradle so the boom and mast do not rub together as we drive down the road. Other wise the rubbing wears a hole in the sail and sail cover. - Fred Replacing Mast – In my case I decided against stays because I wanted to keep the unstayed mast design. My mast broke after ten years of service, so I felt a new mast would mean another ten years. Also I added another 15” to the length of the mast. I bought a mast blank from Nimble for $300. I then took the old mast gear and reattached it to the new mast after cutting the mast to size and carefully drilling the tabernacle boltholes. I figure if I see cracks developing, all I have to do is to cut 12” off the bottom of the mast and re drill the holes. We’ll see! – Ken Buying a New Bay Hen Mast – See letter below from Valmont Industries (an Alumnium Light Pole manufacturer that was used to supply mast blanks for the Bay Hen): Thank you Mr. Murphy. Yes we can provide them to you one at a time. The 2200-19304 A1 is still the correct model number and should be used on any purchase orders you send in. Cost including packaging would be $ 131.00 each plus $87.00 for LTL freight for a total of $ 218.00 per shaft. Lead times would still be 8-10 weeks. You would fax all orders to the attention of Paulette Redenius at fax # 651-463-3349. This is our Minnesota plant where the shafts would be made. Paulette can also be reached at 800-899-7577. Dennis W. Coker Sales Manager OEM/National Accounts Valmont Industries 888-800-0228 Fax 651-463-3349 Some Hen owners have opted to raise their mast using a gin pole and their trailer's winch. Setting up the gin pole takes additional time and a bit more scrambling on and off the boat. There is also some danger involved as a failure of the system may bring the mast down on someone's head. But if the owner lacks the strength to flip the mast up, a gin pole may be the only alternative. See gin pole diagram and directions Starting at the bow and going aft...here is what I have done to date to my bought-new 1998 Nimble-built Bay Hen...now my Poor Man's Power Trawler. My 1998 Bay Hen arrived with a short sort-of-bow sprit that really is the mount for the anchor roller assembly and the large bow cleat. When I two-block the anchor in the roller assembly the stock still flopped around and scratched the wood. I purchased a set of small cast bronze anchor chocks, screwed them into the wooden “sprit”..and the anchor stock is now firmly made fast. The bow anchor is a standard Danforth S600...good for the mud bottoms I'm usually anchored in. . Added self adhesive backed “rubber?” insulation stripping internally around the fore-deck hatch coaming to seal it against rain and spray leaks Removed and carefully mothballed entire mast, boom, gaff and sail and made a somewhat old-fashioned mast stub and cross arm. Rewired same for anchor light and wind direction vane. The wind vane is surprisingly helpful to me when docking. Left lacing on the mast and have box of unused mast loops. Added slabs of foam inside hull forward of mast foot and made bulkhead for cosmetics. Flotation was not a factory option at time of purchase. Also added slabs of foam inside hull in cavities midships formed on each side by the twin bilge board casings. Added a combination - selectable white/red surface mount fluorescent cabin light. The white/red switchable cabin light is a stock catalog item from West Marine. I discovered that when checking things at anchor in the middle of the night, like am I dragging?, am I aground? and “what was that bump-in-the-dark ?” .... the standard incandescent white cabin light of course blasted my night vision. I think it was about $ 43.00. Added washers and sealed leaking bilge board pivot bolt holes with polysulfide. Locked up bilge boards in up position. Added clips on cabin top teak rail to hold boat hook and remote GPS antenna. Replaced ship's factory - supplied 12 volt wet battery with a good and larger gel cell battery. Made a wooden companionway hatch (with portlight) to replace the factory's smoked Plexiglas one. This hatch also allows temporary mounting of ship's compass so one can navigate by compass with hatch closed in foul weather. Added an 8 foot fold-down VHF antenna for ship's main VHF radio located in cabin. Handheld VHF still used from cockpit. Modified the tiller so that it would not hit the top cover of my outboard engine. Added a tiller tamer and also a store-bought telescoping hiking-stick. Made a custom fit wooden cover for the motor well area to keep water from splashing into the cockpit via the motor well opening. Completely filled the lazaret with foam slabs for aft flotation. Added a proper stern light and an ensign staff mount on the aft deck. -- Bill |
8.3 Projects (add-ons to the Boat)
|
| 8.3.1 Gasoline Can Have you noticed that many of the types of gasoline cans on sale today are down right terrible. The fill spots are stuck inside the can, so when you want to pour you get gas all on your hands. They don't seal well and they leak. Walt Elliott had a different set of issues. But the can he devised sure looks like it solves many of the safety and convenience issues concerning these cans. 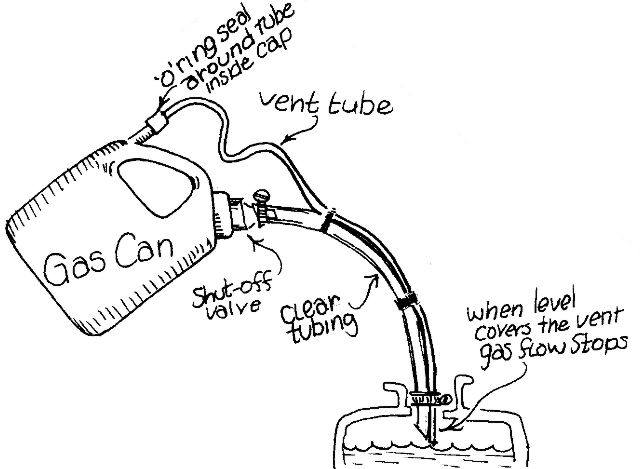
The project
came about to solve the problem of overfilling the tank on my 3 HP Nissan
outboard. On Dovekie it is mounted on the side and overflow goes straight
into the water. My motor has a small internal tank and I'd routinely
refill it underway. The combination of reaching over the side, limited
visibility into the tank and the boat pitching made overflows a
certainty. At the time there were no commercial products available to solve this. I tried several unsuccessful approaches. A particular disaster was using a float in the gas tank. It dissolved and I spent an afternoon anchored at Smith Island cleaning plastic goo out of my tank and fuel system. This project was successful and I've used it for many seasons. I started by putting a commercial twist valve on my fuel jerry can. This has a stub to which I hose-clamped a clear plastic fill-hose sized to reach the motor's gas tank from inside the cockpit. It also allowed an easy means to close-off the can for storage. To make an automatic shutoff I attached tubing to the jerry can vent and arranged it so that when gas in the tank reached the proper level the vent tube was blocked. This stops the flow immediately. I used gas line tubing from an auto store. How you attach the tubing depends on your gas can. I drilled an undersized hole in the vent cap and pushing the tubing through it. Since the vent cap on my can is designed to leak air I put an o-ring under the cap to seal it (The tubing runs through the center of the o-ring as well ). I occasionally pulled the tubing out of the cap while handling the can. Sealing it with a gasoline-resistant epoxy may solve this. I attached the tubing to the fill-hose at several places with electrical tape. At the gas tank end of the hose I used a hose clamp that was bent with a hump that is sized to accommodate the vent tubing. Since the hose clamp is too big to fit into the gas tank it acts as a stop when pushing the fill-hose into the gas tank. The distance from the clamp to the end of the fill hose therefore sets the fill level. As an added touch I cut the fill hose diagonally at the end. This helps the hose to drain off fuel remaining in the hose into the gas tank after flow has been shut off. 8.3.2 Chart – Dining Table Some time back I made a small wooden piece that slips into the slot that holds the companionway hatch. This fixture holds my “ship's” compass when I need it. My all-wood table is thin, heavily varnished plywood, 24 inches wide by 18 inches deep. I made and attached two wooden slotted hook-like arms that allow my table to be hooked over the compass holding gizzmo...with a cutout for the compass. The table has 1/4 inch high coamings to keep things from falling and/or rolling off. All metal fastners are brass due to compass being right there ! The “quickie table” I had been using was simply a slice of varnished 0.5 inch plywood that I laid across the cockpit on top of the cockpit locker hatches It had anti-skid, rubbery shelving material from the hardware store. It keeps my coffee cup from skidding around. It is stowed under the cockpit cushions when not in use. -- Bill 8.3.3 Peep Hen Customizations Ed Kesgen from the HensNests owns Ah So a Peep Hen. He has made up a PDF file with the following Peep Hen improvements: 1. Wind telltale 2. Anchor well decking and anchor cover combo. 3. Boom vang addition 4. Mast hoops 5. Reinforced rudder mount 6. Cabin forward bulkhead organizer 7. Fluorecent lights 8. Tiller extender 9. Texas Aggie windsock 10. Pictures of Ed's first and second mate. Click here to upload Ed's PDF file |
8.4 Equipment Suppliers |
8.4.1 Dovekie Suppliers Dovekie owners please supply info Canvas Here is a portion of an email from Bill Haberer (one of those who worked at Edey and Duff building Dovekies) Concerning the canvas which is a big part of Dovekie. Back when I was there a gal that we sold a Fatty Knees dinghy to has a good sized canvas business in Hampton, VA. We had her make a lot of stuff for us and the quality was great! I called Jo Bostek the other day and she is still going strong. They have many of the patterns for Dovekie and Shearwater canvas and would be happy to help out. As these boats have so much handwork in their make-up, each one is a little different, so the customer might send her an old piece or, better still, bring the boat to her to adjust the patterns. The address is, Canvas & Cushions, 2517 W Pembroke Ave., Hampton, VA 23661. Tel 757-245-7711. Owners name' Jo Bostek. As for anything concerning either the Dovekie and Shearwater, I would be more than happy to help in any way I can. I built the last 35 or so and also worked on 10 of the 11 Shearwaters built. That's not to brag, but I do know how they are built and how rugged they are!! They're great boats and great values and the 25-year-olds are still hale and hearty! Thanks again for continuing SWS. It helps keep the gang together. Bill Haberer 8.4.2 Hen Series Suppliers Sails Sailmaker for Hens is still in existence: SuperSailmakers Ft. Lauderdale, FL 954-763-6621 or 1-800-541-7601 www.sail-depot.com An alternate used by Ken Murphy for a Bay Hen sail: Fowler Sails, Inc 803 NW 25th Ave. Miami, FL 33142, FL 305-638-8885 Jim Fowler at jim@fowlersails.com www.fowlersails.com Another alternate suggested by Wayne Torry: Gambell and Hunter Sailmakers 16 Limerock Street Camden, ME 04843, ME 207-236-3561 info@gambellandhunter.com www.gambellandhunter.com Sail Dimensions Having owned both the "newer" (1999) and the "classic" (1984) Bay Hen sails, I can confirm that there was a change in dimensions over the years. My current, 1984, Bay Hen sail has approx the same dimensions as Ken's (see below), with a mast that extends approx 16 feet above the tabernacle. The newer Bay Hen rig I put on my Marsh Hen has a mast about 2 ft longer - which accounts for the added length in both luff and leach. Also, the newer sail is peaked higher - which also adds to increasing the aspect ratio. I would think that the prospective buyer of a new Bay Hen sail needs to know the height of the mast. My suggestion would be, for the longer (18 ft.above the tabernacle) mast, order a sail with the longer luff and leach. If you have a shorter mast, go with Ken's dimensions. Also, with the bigger sail, it might be prudent to remove an extra 12 inches from the leach measurement - giving extra gallows clearance. Gallows clearance is critical. You must assure the boom will clear the gallows during tacks. I've noted in two newer BHs that the boom-gallows clearance was insufficient or even none existent. This is dangerous, and is most likely a leach dimension problem. Herm's Bay Hen Sail Dimensions: Luff: 12.5' Foot: 15' Leach: 22' Head: 9' Ken's Bay Hen Sail Dimensions: Luff: 10'4" Foot: 15'3" Leach: 20'7" Head: 9'4" Masts See letter below from Valmont Industries (an Alumnium Light Pole manufacturer that was used to supply mast blanks for the Bay Hen): Thank you Mr. Murphy. Yes we can provide them to you one at a time. The 2200-19304 A1 is still the correct model number and should be used on any purchase orders you send in. Cost including packaging would be $ 131.00 each plus $87.00 for LTL freight for a total of $ 218.00 per shaft. Lead times would still be 8-10 weeks. You would fax all orders to the attention of Paulette Redenius at fax #651-463-3349. This is our Minnesota plant where the shafts would be made. Paulette can also be reached at 800-899-7577. Dennis W. Coker Sales Manager OEM/National Accounts Valmont Industries 888-800-0228 Fax 651-463-3349 |