The rig originated in Holland and was in widespread
use in Sweden in the 1500’s. Marsh Hen and Dovekie owners would appreciate
the fact that the rig developed from experience with the earlier sprit rig.
As sail size increased, the gaff was used for the purpose of more easily
spreading large areas of canvas.
The gaff rig has a lot of lines
that can become quite confused and twisted when setting up the rig for the
first time. Since the rig is left on for the season (or multiple seasons)
the bare pole setup is done infrequently. Here is one way to get the
setup done with minimum hassle:
- With mast down and boom and gaff connected, attach upper lazy jack
line to lazy jack eye on mast and tie the two hanging ends to the mast with
a short piece of line to keep them out of the way.
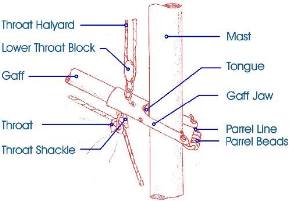
- Attach bitter end of throat-halyard to the attachment loop
of the upper throat-halyard block attached to mast; reeve through the lower
throat-halyard block attached to the gaff jaws; reeve through the upper throat-halyard
block itself, checking to assure the halyard’s entry directions on the blocks
do not result in a twisted halyard; reeve through one of the inner turning
blocks at the mast base and back to the cockpit. The Peep Hen is not
normally fitted with a turning block at the mast base. For this boat,
the throat halyard should be led to one of the cleats on the side of the mast.
Traditionally, for a gaff-rigged boat, the throat halyard is lead to the
starboard side of the mast.
- Attach the bitter end of the peak-halyard to the end of the
gaff; reeve through the upper peak-halyard block; reeve through the mid-gaff
block; reeve through the lower peak-halyard block, checking all the time to
assure the halyard’s entry directions on the blocks are correct, i.e. halyard
will run clean without any twists; reeve through outer turning block at base
of mast just next to throat-halyard; run line to cockpit. The Peep Hen
is not normally fitted with a turning block at the mast base. For this
boat, the peak halyard should be led to one of the cleats on the side of
the mast. Traditionally, for a gaff-rigged boat, the peak halyard is
lead to the port side of the mast.
- Raise and secure mast.
- Run gaff up and down to check for twisted lines. If
no twists, you’re a genius and need not be reading these directions!
- Attach lower lazy jack line to attachment point opposite the
cleat on boom; release the upper lazy jack lines from the mast and thread
the lower lazy jack line through one of the upper lazy jack line eyes; thread
through the lazy jack metal eye on lower mid-section of boom; then moving
to the other side of the boom, thread through the other upper lazy jack
eye and secure to cleat on boom; check to assure the gaff and all halyards
are inside of lazy jacks.
- Attach sail’s throat cringle to the throat shackle on lower
part of gaff jaws; securely attach sail’s peak cringle to the outhaul hole
in gaff’s end with a length of line; starting from the throat, thread the
head lacing through the grommets and around the gaff, ending with several
turns through the peak cringle and tying off the lacing through the outhaul
hole.
- Now attach the sail’s tack cringle to the tack shackle; attach
the luff lacing to the throat shackle and begin threading the luff of the
sail to the mast, raising the sail as you go; tie off the luff lacing on the
tack shackle; some lacing tension adjustment will be necessary to assure
the sail can be raised and lowered freely. Preferred Lacing
Method: To avoid lace binding during hoisting or lowering, use the
following lacing method: attach the lacing to the throat cringle,
and take a turn around the mast and through the first luff grommet.
Now, instead of going around the mast in the same direction as the first
turn, change direction around the mast and through the second grommet.
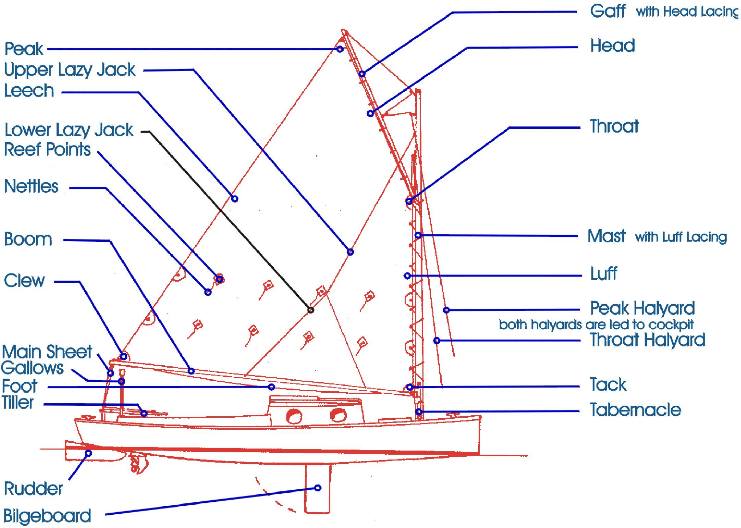
See Figures 1 and 4 which show this pattern. Repeat the pattern attaching
the bitter end of the lacing to the tack cringle.
- Attach the clew of the sail to the boom’s outhaul hole with
a length of line; attach the sheet’s bitter end to the tiller block; reeve
through boom block and then back through tiller block. Place a figure
eight stopper knot on sheet’s working end. Check to assure sheet will
stop the boom’s forward movement before it damages the boom’s gooseneck or
any other equipment. Keep sheet loose so sail flies free.
- Fully raise the sail and adjust lazy jack lines to assure
they are loose when sail is fully raised. Also check to make sure the
boom clears the gallows.
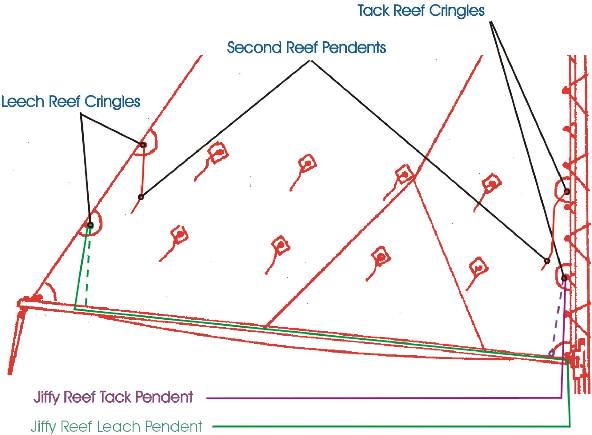
- Attach bitter end of clew jiffy reefing line to the attachment
point of the reef block located near the end of the boom; thread through first
reef clew cringle and reeve through the reefing block; thread through reefing
eyes along boom forward; reeve through the free inner turning block; bring
back to cockpit, reeve through other cockpit or cabin top blocks where present.
The Peep Hen is not normally fitted with a turning block for the clew jiffy
reefing line. Thread this line through the hole in the cleat on the
port side of the boom and tie a stopper knot in the end of the line.
- Attach bitter end of tack jiffy reefing line to tack shackle;
thread through first reef tack cringle; reeve through outer turning
block and back to cockpit, reeve through other cockpit or cabin top blocks
where present. For the Peep Hen, attach bitter end of tack jiffy reefing
line to the cleat on the aft side of the tabernacle; thread through first
reef tack cringle; lead the line back to the cleat on the aft side of the
tabernacle. Thread this line through the hole in the cleat and tie
a stopper knot in the end of the line.
- For the Bay Hen or boats that have been fitted with lines
leading to the cockpit, assure jiffy reefing lines are not twisted and thread
them through the holes in cockpit cleats; place stopper knots on ends of
reefing lines.
- Lower sail and check that lazy jacks are working to hold the
sail. Fold the sail smartly by pulling leech and making neat folds on
top of boom. Work from clew to peak. As you fold sail use gaskets
to hold in place.
- Check peak and throat halyard lengths (when the sail is in
the lowered position there should be a little excess halyard length hanging
in the cockpit). I do not attach my halyards to their respective cockpit
cleats but this is an option.
The Hen’s gaff rig should be made ready for trailering
as follows:
- Make up a 10’ “halyard keeper” of good quality 1/8” line. Make
an eye on one end dimensioned to fit snugly about the large cleat fixed on
the front of the mast.
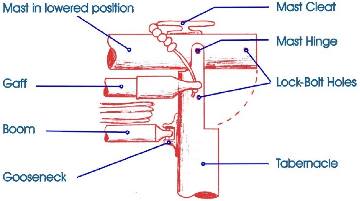
- Decide on which side the rigging lines will fall as you lower
the mast. Assure that the gaff is not sticking out on that side.
This will assure that when you raise the mast the next time, the rigging will
not get caught on the gaff.
- As you walk up forward work the keeper around the halyards
and lazy jacks and attach the loop to the cleat while holding the other end
in your hand. Loosen the mast wing nut and carefully take off and pocket.
Push bolt in an inch and position yourself to take the weight of the mast.
Take bolt out and carefully set the mast down on gallows assuring that the
rigging lines fall on the side you want. Keep at least two spare mast
bolts and wing nuts on board. Be reminded that Peep Hens use “mast pins”
and “clips” in place of the “mast bolts” and “wing nuts” described above.
- Pull the end of the halyard keeper to take up most of the
slack in the rigging and loop the keeper’s excess around the forward part
of the sail and mast. Tie to mast cleat.
- I then tighten halyard and reefing lines and secure to cockpit
cleats just for a neat look during trailering. But you need to remember
to loosen these lines before attempting the raise the mast next time you set
the rig up.
- Using sheet, make several loops around mast, boom, and gallows/mast
chock; secure neatly to stern cleat.
- Tie a last gasket around mast, boom, and sail about 1/3 of
the way aft to support the boom. This gasket also helps to straighten
up the remaining rigging, just pull the loose rigging lines through this
gasket to clear the cockpit of any drooping rigging.
- Put sail cover on. Whoops, sorry I need to explain that
I made a sail cover that fits over both the sail and lowered mast.
It’s a very simply design with a 20’ large plastic zipper. It looks
much better than the regular sail cover, but would not work if you keep the
mast up. Of course, a regular sail cover must be put on before the
mast is lowered.
- Refer to Trailer Section for the rest of the “getting ready
to trailer” routine.
|
