|
“Seamanship,
in its widest sense, is the whole art of taking a ship from one
place to another at Sea. It is an amalgam of all the arts
of designing a ship and her motive power ... of working her when at
sea, and in harbour, and the science of navigation by which way is
found from her point of departure to her point of arrival. It
thus embraces every aspect of a ship's life in port and her progress at
sea.” The Oxford Companion to Ships & the Sea |
6.1 Navigation |
| “"The sailors, moreover, as they sail over the sea,
when in cloudy weather they can no longer profit by the light, or when the world is wrapped in the
darkness of the shades of night, and they are ignorant to what part of the horizon the prow is directed, place needle over the magnet, which when whirled round in a circle, until, when the motion ceases; the point of it [the needle] looks to the North."
Alexander Neckham, 1187 |
6.1.1 Prologue - Avoiding Embarrassment or Death |
|
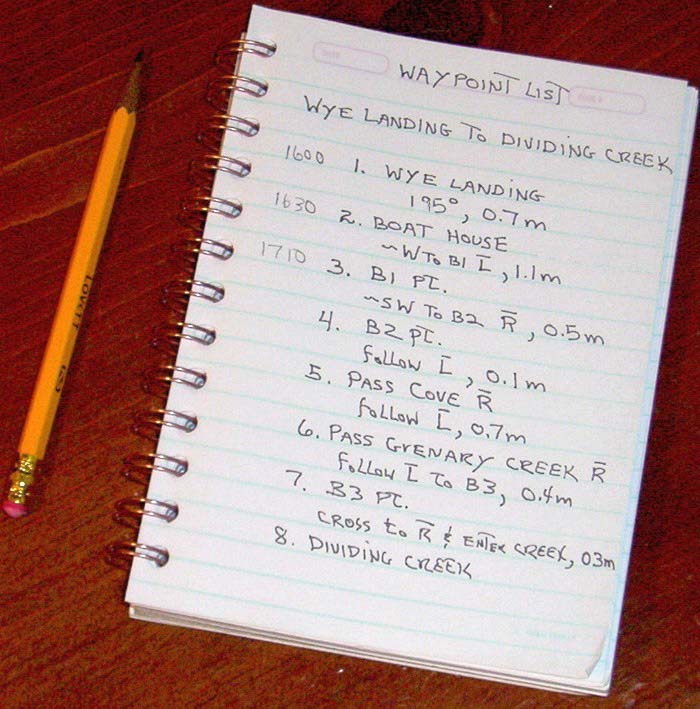
I remember the last day of a cruise with a good sailing buddy who will go unnamed. We were returning to the ramp, but had to sail across a five mile body of water in a heavy fog. I lost sight of him as we sailed across. I felt confident, because I had my GPS and all I did was to retrace my track of the previous day. Even with the GPS I was still a little nervous being surrounded by all that white mist. It's scarey even when you think you know where you are. I got across alright and found the ramp. I retrieved the boat and had it all packed up for the road when my buddy pulled in about an hour later. He did get across, but spent the extra hour finding a familiar point of land that he recognized, finally getting to the ramp. Just before leaving, he mentioned that he decided to get a compass for his boat! Another example that goes well beyond simple embarrassment involves a fleet of Royal Navy war ships, as described in Alan Gurney's book "Compass". On the night of October 23, 1707 a lookout called out "Breakers ahead". Gurney writes in his book: "Minutes later, in the howling dark of an autumn night, four ships of the Royal Navy fleet were mastless hulks being pounded to pieces between the hammer blows of the Atlantic breakers and the anvil of the Scilly Island's granite reefs. Some two thousand men and officers from HMS Association, Eagle, Firebrand, and Romney died that night ... One more vessel, HMS St. George, struck hard but surged clear and survived." Poor understanding of the vagaries of the magnetic compass was a key factor in the above sea bourn tragedy. |
6.1.2 Step One - A Course to Take and Books to Read |
|
There is a lot to navigation and we cannot cover every aspect of the subject in this manual. So we must assume you have already mastered the basics. The very first step in this direction is to take a navigation course. One such course is the Coast Guard Auxiliary's Advanced Coastal Navigation Course. This is a pretty tough course, but well worth the $60 that gets you a navigation book, charts, and a starter set of navigation instruments. The course is generally taught by dedicated volunteers. One of my teachers had an hour's drive, all the way from Annapolis, to teach the course in Gaithersburg. That's dedication. The course focuses on the following main topics: The marine magnetic compass The nautical chart The navigator's tools and instruments Dead reckoning Piloting Current sailing Tides and tidal currents Radionavigation Navigation reference publications Fuel and voyage planning Note: This course may no longer be offered at your local CGAUX. Current courses may be titled: Navigation for the Recreational Boater and GPS for Mariners. If you Google marine navigation courses or Coast Guard Auxiliary you may find courses close to your home. Even though I have over forty years experience in "keeping track of where I am and where I'm going" the course was helpful and fun (and lots of work). I think it should be a required course for all SWSers. I know there are among you, members who enjoy charts, trip planning, and simply the thought of getting a star fix via sextant on a rolling deck of the three masted bark. Such members may consider navigation as a fun hobby, like doing the New York Times crossword puzzle, something that challenges the mind. For such members, this course will satisfy their sense of accomplishment. As for reference books, the following are on my book shelf and are frequently opened and read with interest: Advanced Coastal Navigation, AN-1, by the U.S. Coast Guard Auxiliary. Newer publications are available. Fundamentals of Kayak Navigation, by David Burch - (you will find that kayakers and solo SWS sailors have much in common). Boat Navigation for the Rest of Us, by Captain Bill Brogdon - (a very practical read that suggests navigation requires constant vigilance/practice and the continuous accumulation of knowledge). |
6.1.3 Shallow Water Sailor Navigation |
|
Most SWSers own trailerable sailboats. We tend to travel quite a bit to waters that are not well known to us. Small lakes and rivers generally require basic navigation skills while large bays and complex waterways require significant planning and advanced navigation skills. A case in point concerning complex navigation was the SWS summertime cruise on the North Channel of Lake Huron, August 2000. See Cruise #9 on our web pages for photos combined with a report of the cruise by Laura DeMass. Eight SWS boats launched from the Spanish Municipal Marina, Spanish, Ontario. I was a solo sailor on my Bay Hen, Sanity. As a solo sailor you are quite busy setting the boat up and getting underway. Before leaving the ramp I turned on my GPS and marked a waypoint for the ramp, a simple habit of mine on most cruises. Once away from the ramp and out in the main body of water, I had a chance to look around. First I noticed that none of the SWSer boats that left before me could be seen. Also I saw four or five different islands spread out before me. As I was at the tiller, and the wind was maybe 15 knots, I could not leave the tiller for even a moment. So under these conditions the solo sailor must have every navigational aid right at hand; as one hand is on the tiller, this means the sailor has only one hand to deal with the aids. Think on this. There is no full time navigator aboard, there is no chart room, no electronic console. There is but one hand, a chart in a plastic folder and in my case, thank goodness, a GPS with waypoints marked for the planned first day route. I had a small map I made up at home showing the waypoints and all I did with the one free hand was to set my route for the first waypoint and off I went with some confidence. So a number of the subjects taught in the Coast Guard's class I could not use. No dead reckoning plot was drawn as I sailed along, an impossibility when single handing. No use of radar or other advanced electronics. As you will see, planning and preparation is the key for a solo sailor. In my study of available books on navigation I found that those written for the sea kayakers are closest to what a SWSer needs. Of these books the one by David Burch, Fundamentals of Kayak Navigation is outstanding. This book rang a bell in my ordinarily forgetful mind, as this was the very same book that Peter Neal suggested in his "Winter Thoughts" message in the SWS Issue #116. So I got the book, and yes, it is the one for us. We do not have a full time navigator on our boats whose sole job is to keep up a dead reckoning plot of our position, and to make periodic fixes that assure we know where the boat is at all times. As with the sea kayaker, we must do a lot of planning that may include a route with compass courses, time/distance to each waypoint and other planning information, that, during the trip, we refer to and make quick notes as we pass each waypoint or preplanned fix. |
6.1.4 The Importance of Practice |
|
Before going into David Burch's book, Fundamentals of Kayak Navigation, there is an important point to make concerning practicing navigation. In Captain Bill Brogdon book, Boat Navigation for the Rest of Us, Brogdon returns frequently to the idea that one must master navigation by practicing it all the time. If you find yourself in a dense fog in strange waters and you haven't practiced maintaining a compass course during fine days in familiar waters, you may find yourself in trouble. Mastery of navigation comes only with practice and feedback. If you can't follow a compass course to a buoy five miles away, in good weather, how can you possibly find it in a fog? Brogdon gives this example: imagine that you are leaving a ramp and navigating a buoyed channel having pairs of red and green buoys leading you out of the shallows. To quote Brogdon, "A beginner lines up the boat with the buoys and proceeds safely. So does an experienced navigator, but the navigator also: 1. Notes compass course. 2. Notes range or leading mark ahead. 3. Watches water flow at buoys to estimate current and set. 4. Is alert to cross-channel set. 5. Notes buoy numbers as the boat passes them. 6. Knows the next course. 7. Knows where to look for buoys on the next leg. 8. Watches depth to note changes. 9. Checks compass deviation." Brogdon goes on to say that, "A navigator may not do all of these things every trip, but he keeps accumulating knowledge of familiar ports." So his basic theme seems to be:
In thinking about what SWSers should do to follow this theme, one first step would be to practice some navigation on your next trip out. My suggestion is to produce a Route Plan for your next cruise. Such a plan requires you to carefully review the charts of your cruise waters and come up with a Route Plan that you will refer to during the cruise. |
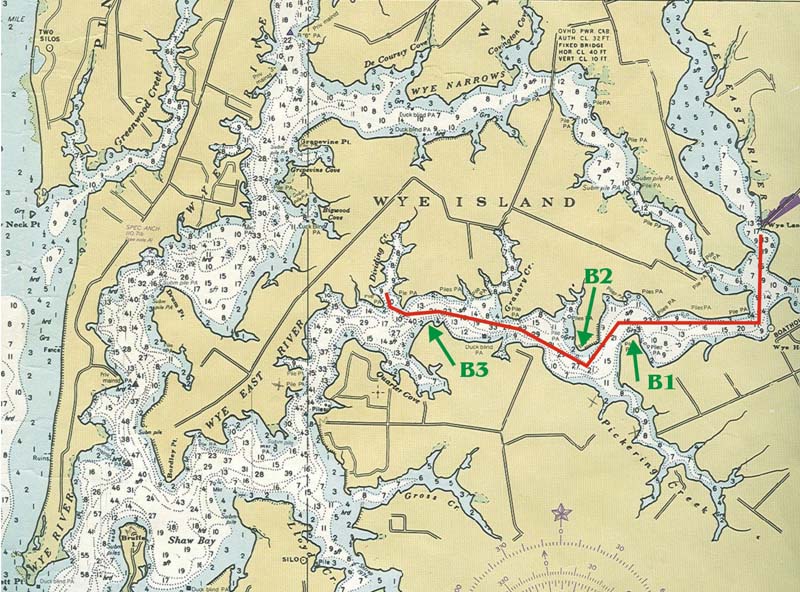
6.1.5 A Route Plan (using a "little memorandum book") |
|
SWSers generally do not have a full time navigator on their boats whose sole job is to keep up a dead reckoning plot of position and to make periodic fixes. We are captain, coxswain, steward, and navigator rolled into one. So for our navigator role, we must do a lot more planning. This includes writing down our planned route with compass courses, time/distance to each
waypoint and other planning information, that, during the trip, we refer to and make quick notes as we pass each waypoint or preplanned fix. Each body of water presents its own set of navigation concerns, and so your route plan will differ depending on your cruising ground. Some trips will involve hazards, open water, high currents, shallows or covered rocks, that should be noted in the route plan. So here goes. Let me try to produce an example route plan, one using a favorite cruising ground on the Chesapeake Bay. This example involves, in part, keeping an eye out for points of land. But first you must read the following excerpt from Mark Twain's Life on the Mississippi, Chapter 6 - A Cub Pilot's Experience! **************************** What's the name of the first point above New Orleans?' I was gratified to be able to answer promptly, and I did. I said I didn't know. Don't KNOW?' This manner jolted me. I was down at the foot again, in a moment. But I had to say just what I had said before. Well, you're a smart one,' said Mr. Bixby. What's the name of the NEXT point?' Once more I didn't know. Well, this beats anything. Tell me the name of ANY point or place I told you.' I studied a while and decided that I couldn't. Look here! What do you start out from, above Twelve-Mile Point, to cross over?' I--I-- don't know.' You--you--don't know?' mimicking my drawling manner of speech. What DO you know?' I--I-- nothing, for certain.' By the great Caesar's ghost, I believe you! You're the stupidest dunderhead I ever saw or ever heard of, so help me Moses! The idea of you being a pilot--you! Why, you don't know enough to pilot a cow down a lane.' Oh, but his wrath was up! He was a nervous man, and he shuffled from one side of his wheel to the other as if the floor was hot. He would boil a while to himself, and then overflow and scald me again. Look here! What do you suppose I told you the names of those points for?' I tremblingly considered a moment, and then the devil of temptation provoked me to say:- Well--to--to--be entertaining, I thought.' This was a red rag to the bull. He raged and stormed so (he was crossing the river at the time) that I judge it made him blind, because he ran over the steering-oar of a trading-scow. Of course the traders sent up a volley of red-hot profanity. Never was a man so grateful as Mr. Bixby was: because he was brim full, and here were subjects who would TALK BACK. He threw open a window, thrust his head out, and such an irruption followed as I never had heard before. The fainter and farther away the scowmen's curses drifted, the higher Mr. Bixby lifted his voice and the weightier his adjectives grew. When he closed the window he was empty. You could have drawn a seine through his system and not caught curses enough to disturb your mother with. Presently he said to me in the gentlest way- My boy, you must get a little memorandum book, and every time I tell you a thing, put it down right away. There's only one way to be a pilot, and that is to get this entire river by heart. You have to know it just like A B C.' ************************
|

| Once in a river-like channel, other methods of navigation can be used, e.g. the use of physical landmarks to guide the way. The next waypoint is a point of land that I named B1 (for the first point after the boathouse). Once at the Boathouse and looking west, the most marked physical landmark is this point of land. So for the next leg, I just note that we will be sailing approximately west for 1.1 m until we reach B1 Point. I also thought it would be a good idea to indicate which shore the point would be on. So I used L with a bar on top to denote the left shore. Once past B1 the next landmark is Point B2, you will note I indicate that we will be passing two creeks on the right shore. These are not waypoints but preplanned fixes, so as you pass them you will know where you are. Also, after the B2, I note that we should simply follow the left shore. The next point, the Point B3, will not be immediately apparent but will come into view in a mile or so. And lastly as you pass this point, the direction says to cross over to the right shore and follow it into Dividing Creek. This example Route Plan uses nothing more than the logic one uses when simply navigating via the chart alone, but having to think about it and write it down helps organize your thoughts and will help you remember the compass course and physical waypoints needed to navigate confidently. So try making a route plan and test it out the next time out. As you pass each waypoint or preplanned fix, write the time of passage to remember where you are. Also once you've drafted the route plan, review it with such concerns as the following: 1. Have you accurately determined the compass courses and distances for the necessary legs? 2. Have you checked your route for high wind and wave exposure; should it be modified to minimize such exposure? 3. Are there any hazards along the route and have you noted them? 4. Have you noted the safe havens along the route that might be used in case of bad weather? So now you know about the use of points of land to navigate by, as well as the use of the "little memorandum book." Mr Bixby and Mark Twain would be proud of you. |
6.1.6 Compass Basics |
|
For a full history of the magnetic compass, the book Compass by Alan Gurney is highly recommended. If you like audio books I recommend the Books on Tape audio of Compass read by John Lee. Below is a simple summary of the compass basics: 1 degree of Latitude = 60 nm , 1 second of latitude = 1 nm (not so for Longitude! Use latitude scale to measure distance). The following "directions" are measured in degrees (with 360 degrees in the full swing of the compass). T = True direction - Based on the chart's geographic meridian lines that point to the north pole. M = Magnetic direction - Based on the meridian lines that point to the magnetic north pole. C = Compass direction - the compass' heading. V = Variation - Difference between geographic (true) and magnetic meridians. D = Deviation - Effect of vessel's magnetic fields upon a compass. To find the relationships between True, Magnetic, and Compass headings use the following mnemonics:
For small wooden or fiberglass vessels, with careful avoidance of magnetic fields near the compass (such as items containing iron), deviation can generally be ignored. As variation is west on the east coast and east on the west coast, you can make up your own equation for your particular waters. The Chesapeake has a 11 degree westerly variation (check all charts in your cruising area to make certain variation is nearly the same). So for the Chesapeake, in general, the following equation applies: C = M = T + 11 For the Shallow Water Sailor, true directions taken off charts should be converted to compass directions when planning the compass course legs of a trip. |
6.1.7 Natural Ranges |
You may have already used a navigation range while in buoyed channel that is made up of two lights or boards, one low, the other higher; where the low one is closer to you as you approach it, and the higher one set back a 50 yards or so. When lined up this navigation range gives you a line-of-position (LOP) right down the center of the channel. They are quite effective in keeping you in the channel's center and allowing you to adjust for the possible side-to-side drift caused by current or wind. Of course it goes without saying you must keep your eye out for any ship that might be using the same LOP! But I bet you haven't tried a natural range yet! In David Burch's book, Fundamentals of Kayak Navigation, he makes a big thing about the kayakers use of such ranges. My suggestion is to study a chart of your favorite waters and pick out several natural ranges and test them out while you're on the water. The sketch below was taken from Burch's book and provides a number of examples of natural ranges.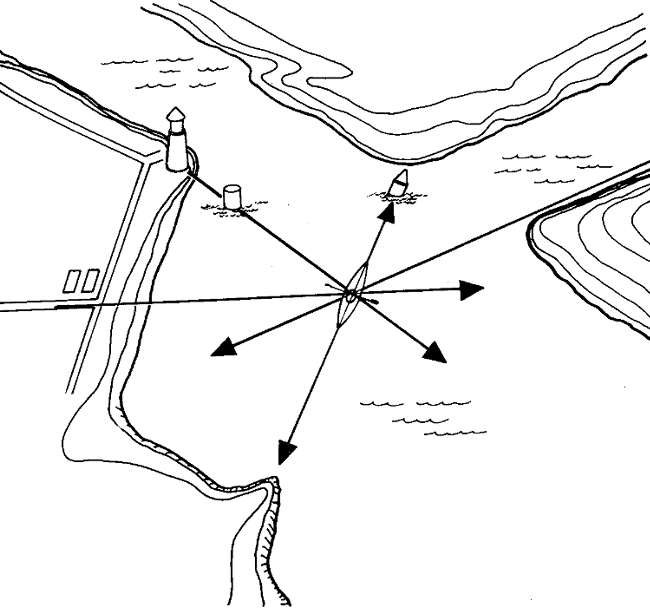 My one experience finding and using a natural range was when leaving a favorite ramp inside a nice cove. There was an extra low tide and I was shocked to see a nasty boulder sticking out, right at the cove's entrance. I must have passed over that boulder a dozen times before, probably at high tide. Now how could I remember its location the next time I left or entered the cove? As I looked around I noticed a nearby house and as I maneuvered around the boulder the left side of the house lined up along my route. Well from then on, I just lined up with the left side of the house and came and went safety without a worry. Below is another quote from Life on the Mississippi where Mark Twain continues his cub pilot training; here Mr Bixby teaches Mark (and us) the importance of natural ranges: ************************ "If there had been a conspicuous dead tree standing upon the very point of the cape, I would find that tree inconspicuously merged into the general forest, and occupying the middle of a straight shore, when I got abreast of it! No prominent hill would stick to its shape long enough for me to make up my mind what its form really was, but it was as dissolving and changeful as if it had been a mountain of butter in the hottest corner of the tropics. Nothing ever had the same shape when I was coming downstream that it had borne when I went up. I mentioned these little difficulties to Mr. Bixby. He said That's the very main virtue of the thing. If the shapes didn't change every three seconds they wouldn't be of any use. Take this place where we are now, for instance. As long as that hill over yonder is only one hill, I can boom right along the way I`m going; but the moment it splits at the top and forms a V, I know I`ve got to scratch to starboard in a hurry, or I`ll bang this boat`s brains out against a rock; and then the moment one of the prongs of the V swings behind the other, I`ve got to waltz to larboard again, or I`ll have a misunderstanding with a snag that would snatch the keelson out of this steamboat as neatly as if it were a sliver in your hand. If that hill didn't change its shape on bad nights there would be an awful steamboat grave-yard around here inside of a year. "It was plain that I had got to learn the shape of the river in all the different ways that could be thought of, upside down, wrong end first, inside out, fore-and-aft, and thortships,' and then know what to do on gray nights when it hadn't any shape at all." ************************* Members are asked to send in additional navigation sections. |
6.2 Getting Underway |
| “Away then, Onto the waters. The land grows distant, The waters begin their work. The spirit, refreshed, Returns anew.” Ken Murphy |
| After all your preparatory work, getting the time off, packing food and clothing you have gotten to the ramp and the boat is in the water, this is when life really starts, you lucky one you. This section provides a few thoughts about getting underway. |
6.2.1 Peter's Immutable
Dovekie Rules
|
GENERAL: There are a number
of “immutable” rules concerning the DOVEKIE that best fall in
this section. Also, this manual includes some subjective
thoughts, as well as objective instructions. We recommend you
follow them until you thoroughly understand the boat and its workings.
Then feel free to experiment. Please tell us if you find better
ways to do things.
|
6.2.2 Wind, Weather, Objective |
| As part of the cruise preparations you have familiarized yourself with the cruising grounds by carefully studying the area charts, coast pilots, and other such information. You have probably made tentative plans for the places you want to visit during the day and where you want to anchor for the night, it is at the ramp where you make the final decisions. You have listened to the latest weather forecast and you have observed the wind and wave conditions of the local waters. Ideally you have observed these conditions in unprotected parts of the cruising grounds so you know what to expect when you get to open water. It is now that you consider last minute changes in your cruise plans. If conditions are unsuitable or bad weather is expected, this is also the time to decide NOT to launch. Many ramps offer close quarters that require some accurate maneuvers when getting underway. So wind and current should be observed and a plan made for leaving the ramp either by sail or engine. |
6.2.3
Centerboards, Bilgeboards, and Leeboards
|
|
Generally, when leaving a ramp under power, it is a
good idea
to lower the centerboard (read bilgeboard or leeboard) to limit
sideslip while maneuvering in close quarters. Flat-bottomed boats
need extra lateral resistance to make tight turns and to control the
boat nicely when going astern. Here are some added thoughts about
the boards. 6.2.3.1 Bay Hen Bilgeboards The early Bay Hens have off-center centerboards that work quite well but take up cabin space and make the sleeping arrangements tight for two people. The newer Bay Hens have two bilgeboards that give more sleeping space below. Bilgeboards are operated much like leeboards on the Sea Pearl or Dovekie. Generally, the board on the lee side is fully dropped to a vertical position to provide lateral resistance while beating upwind. The amount of board down depends on the point of sail. Experimentation is needed but the board can be brought up to the half position when on a broad reach, and can be fully withdrawn when going down wind. When using the engine the board should be used when tight maneuvers are required and possibly when quartering into a heavy breeze. The movement of the Bay Hen's bilgeboard also effects the location of the center of lateral resistance to some extent. Therefore when sailing upwind in heavy air, weather helm can be somewhat reduced by bringing up the centerboard pendent a foot or so. See more discussion in the Sailing in Heavy Air section. discussions of leeboards, etc. need to be added. |
6.2.4 Location, Location, Location |
|
When
launching into unfamiliar waters, it is while you’re at the ramp that
the question, “will I be able to find my way back” should be asked. If
you have a GPS, mark the ramp’s location. If you are navigating by
compass, keep some notes as to the compass courses you take. When in unfamiliar waters, make the habit of looking back as you leave the ramp. Memorize, or even note in your log, the obvious features as well as aids to navigation, that you will use on the way back to relocate the ramp. The features can dramatically change as you move further away from the ramp so look back every mile or two. I had one buddy who got lost coming back to the ramp in heavy fog. It took him an extra hour before he finally arrived. It was then that he said he didn’t have a compass and, by the way, he’ll be picking one up on the way home! |
6.2.5 Hoisting and Striking a Gaff-Rigged Sail |
|
During setup at the ramp you should check to make sure the parrel line (see Figures 2 and 4) of the gaff jaw is properly placed above the mast cleat. This line sometimes falls below the cleat and gets stuck as you try to hoist the sail. If you've motored away from the ramp and are clear of land, you can start the hoist while drifting beam to the wind. [It is customary, in most sailboats, to raise the sail with bow into the wind. I do this only if I'm under power with crew in heavy seas or when on a mooring. But in most fair conditions and when I'm solo raising the gaff sail with lazy jacks, with the beam to the wind works fine, I am careful to assure the sheet is running free.] Gaskets are removed and the sheet loosened to allow the sail to shake freely. Both the peak and throat halyards are taken in hand and hauled together. Once the gaff is raised a foot or two, I like to raise the peak a few feet above the throat before I continue to haul on both halyards. Once the luff of the sail is fully extended give a good pull to tighten it and cleat the throat halyard off. Continue raising the peak. I find that if I over peak the sail, just a little, where you see a wrinkle just beginning to form from the peak to the tack of the sail, it's time to cleat the peak halyard. Once you take in the sheet and begin sailing, the wrinkle disappears and the sail is smooth. If I don't over peak, the sail will droop with wrinkles forming from the clew to the luff. Not pretty, and you do want to look pretty out there! Striking the gaff rig, especially in heavy winds and tight places, should be a well practiced evolution. It can get nasty if the sail does not come down nicely before the wind gets into the sail and blows you around. The peak and throat halyards should run free as you take the sail down. I flake my halyards down into a little nest right below their cleats on the cockpit seat as I raise the sail. I don't like to coil them, as they might get stuck as you take the sail down. When the wind is up I sail upwind, untie the halyards, but hold on to them, shoot up into the wind, drop the halyards and immediately, and quickly, pull the leach of the sail down. The gaff should come down parallel with the water. With practice you should be able to drop the sail in less than 4 seconds, that is fast enough to assure the sail is mostly down before the boat begins turning beam to the wind. You then need time to tie the gaskets around the sail, then anchor or start the engine, so make sure you have plenty of drifting space. |
6.2.6 Hoisting and Striking other rigs must be added |
| Include
following suggestions for Dovekie need
to be integrated into text: DRAIN PLUG IN life vest on or nearby Water, sunscreen, ... nearby rudder down or ready to be lowered leeboard down or ready (sling removed) sheet clear, ready for mast raising. Mast up or ready, shrouds clear and attached, forestay clear. |
6.3 Sailing in Light Air |
| “Light
Breeze: small, short wavelets; crests have glassy appearance and do
not break” The Oxford Companion to Ships & the Sea |
|
Sailing a sprit rigged Dovekie or a gaff rigged Hen boat or any SWS, on
a balmy day can be most exhilarating! Concerns for sail damage, rigging
strength, tiller & rudder integrity, (the skipper and crew!), that
often accompany heavy weather sailing can be mostly forgotten as one
lies back to enjoy the ambiance of nature's best. 6.3.1. Sail Adjustments In general, light air dictates a fuller sail, so halyard and outhaul tension should be more relaxed than that incorporated during breezier times. Easing line tension results in more sail draft (curvature), hence a more efficient shape is created to capture those light breezes. Those who have boats with a gaff, should try a halyard setting less peaked than usual. When adjusting the peak halyard on Hens with gallows always check to ensure the boom will still clear the gallows otherwise the sail may get stuck when tacking. This is also a good time to experiment with centerboard settings. Usually, the harder on the wind, the more board you need employ to resist leeway. When going downwind, raise the board to reduce friction but retain enough surface to preserve ample steering control. 6.3.2. Going to Windward Going to windward, or "beating", is best accomplished in boats with a single sail, by not attempting to sail too close to the wind. Most authorities state that 40 to 45 degrees into the wind is the best that any boat can muster. Experience with the cat rigged Hen or Dovekie, shows that while some headway can be made at this angle, performance is sluggish and, unless it seems prudent to make a particular mark, easing the sheet and setting a course about 50 degrees off wind will allow the boat to sail free with noticeably improved speed and tiller response. Experiment, but don't sail too closely hulled. When beating, such boars usually like to have their booms set a bit beyond the edge of the deck. 6.3.3. Reaching Sailing with the wind at a right angle to the boat is termed "reaching" and should probably be the first kind of sailing practiced by the new skipper. Under most conditions, it is the safest and most enjoyable point of sail and it is while reaching that your boat can obtain its best speed for a given wind speed. While reaching, remember the axiom: "when in doubt let it out" referring to the sheet adjustment. When on a reach, let the sail out until it just begins to luff, then pull the sheet in gently till the luffing stops. That's all there is to it. This will give you the most efficient sail set (translation: speed) while reaching under most wind and sea conditions. 6.3.4. Running Running in flat water on a light air day can be downright deceiving to the senses. You feel little air motion and the impression is one of hardly moving. Checking your wake will prove otherwise and, since you can sail directly to your destination, a check of your watch will show you are making good progress indeed. The sail should be set almost broadside to catch as much wind as possible, but even in light air you must remain vigilant to wind direction and beware the tendency for an unexpected jibe : See 6.3.6. 6.3.5. Coming About Changing direction by turning the boat from one tack, through the wind, to the other tack, is called "coming about". It is the safest way to execute a turn on a sailboat and it should be practiced frequently by all new boat owners during varied conditions. First warn the crew by calling out, "ready about", and upon calling out the command, "hard-a-lee", push the tiller towards the boom to smoothly send the bow through the eye of the wind until the sail again fills. The maneuver must be made decisively, and care must be taken to hold the tiller over until the sail begins to fill on the opposite side. It is best to let the boat bear off the wind to gain momentum on the new tack before attempting to sail higher on the wind. Every boat has its own characteristics and idiosyncrasies to display when coming about. Practice is always required on a new vessel to get its feel and to execute maneuvers smoothly and efficiently. In general, heavier boats follow through the turn with less effort, but all have a learning curve and in the beginning it is not unusual to come up short with the sail luffing and the boat floundering to windward with no headway and thus no rudder control. To prevent going into "irons" ( boat pointed into the wind and stopped such that the rudder becomes ineffective) the coming about maneuver should be started with the boat at speed and close to the wind. The centerboard or bilgeboard adjusted to provide effective lateral resistance (generally down all the way). The rudder is then put over to about 35 degrees to turn the boat effectively. When in irons in light air, slaloming the rudder will probably be sufficient to turn you enough to catch the breeze, but if wind conditions strengthen, you may need to incorporate the instructions given in the "Sailing in Heavy Air" section. Always remember when coming about, most SWS boats must turn 100 degrees from it's prior course, so make sure to come completely through the wind before adjusting the tiller. Experience will dictate when coming about will set you on the course that will clear the objective, for instance, a point of land. As you tack upwind approaching the point of land, you will be watching for that last tack that will finally bring you around the point. As you approach the point it will be on the weather side of the boat. If you tack when the point is broadside you will be disappointed. You need to hold your course till the "target" is 10 more degrees abaft the beam before coming about. After a few tries you will get the timing right. Tacking upwind is a challenge, and when you've accomplished your objective, you feel a sense of pride. 6.3.6. Jibing The jibe is the quickest and most direct way of changing direction with the wind on your stern, but extreme care must always be taken. Alert the crew by calling out, "prepare to jibe". Insure that the wind is dead aft or slightly over the side of the boat opposite the sail. Pull in the sheet until the end of the boom is nearly overhead. The sheet should be flaked out carefully in preparation for its release on the opposite tack. Call out the command, "jibe ho" as you ease the tiller away from the boom and the wind catches the back of the sail and swings it across to the opposite side. Even while sailing in a light breeze, the boom must be controlled. Once the boom passes overhead release the sheet steadily out onto the opposite tack. An unrestrained jibe, even in light air, can place unnecessary strain on the sail, fittings, and rigging . Refer to Section 7.7 that discusses jibing in heavy air. When the winds are light, take advantage of the conditions and plan to do some drills to improve your skills and train the permanent crewmembers. Also, during light wind days don't be lulled into inattention. It may be a seemingly lazy day, but always be attentive to your sailing, be on watch for weather changes, and of course lookout for other boats. Above all enjoy your journey; this is the kind of day in which your SWS boat was designed to revel! |
6.4 Sailing in Heavy Air |
| Typhoon
comes from the Chinese, "tai fong" which understandably means
"great wind", while
hurricane is originally from hurrican a Caribbean word that meant "evil
spirit". Word Origins by Wilfred Funk |
|
"Heavy air" , "heavy seas", "heavy weather", all are nautical
expressions for a strong breeze. Heavy weather is that condition which
challenges a sailor's expertise, experience, strength, and fortitude. 6.4.1 Sail Adjustments 6.4.1.1 Shape Adjustments More wind dictates tighter lines. Pull the halyards and outhauls taut to help flatten the set of the sail, taking care not to stress the cloth and the fittings. When possible, make these adjustments, reef the sail, and raise the sail while the boat is relatively protected from the weather, before setting out on open water. 6.4.1.2 Reefing of the Gaff Rig Refer to Figure 4 that shows the reefing system on a Gaff Rig. The first reef is made with the jiffy reefing pendents. When you are caught in open water with an increasing wind you can make the first reef from the cockpit using the jiffy reefing pendents. When going upwind the boat will tell you when its time to reef, its angle of heel will become uncomfortable, the sheet tension will become high, and her weather helm will become excessive. To jiffy reef let go the sheet completely, then ease the peak and throat halyards to drop the gaff about 4 feet. The sail gathers in her lazy jacks even if the boom is hanging out over the water. You tighten up on the two jiffy reefing pendents, reset the halyards, and readjust the sheet. And your off with reduced sail. She will sail as fast as before, but the weather helm will be reduced. The reef nettles need not be tied in this situation. However, reefing is best done leisurely while at anchor in a quiet spot where you can leisurely tie in the reef pendents. When the wind requires the second reef that is not set up for jiffy reefing, it is recommended that you anchor in a spot protected from the wind, as the second reef requires the sailor to go forward to tie the tack pendent. Better to do this while anchored. It also means the boom must be brought in to gain access to the clew for tying the clew pendent. When anchored, raise the gaff a foot off the boom so you can see what your doing. Tie off the clew and tack pendents, and using reefing knots, tie the nettles around the sail. Remember, the Hen's gaff rig is free footed and so do not tie the nettles around the boom. Care must be taken to tie the correct nettle ends together. That is, do not tie a first reef point nettle together with a second reef nettle (done that). I have thought it might help to use a color marker pen at the tips of the nettles to prevent such an unseamenlike error.
If you're not used to tying a reef knot (also called a square knot) it will take you some time to get it right. The usual error is to tie a granny knot where you make the last tuck of the knot from the same side rather than the opposite side of the knot. Once you've mastered the reef knot try tying the slipped reef knot. The advantage of the slipped reef knot is the ease in which you can untie the knot when shaking out a reef while underway. 6.4.1.3 Scandalizing the Gaff Rig This is an emergency procedure, to make a quick temporary reef, say to reduce speed or get control of the boat temporarily while under increasing wind conditions. Scandalizing is accomplished by lowering the peak of the gaff down against or close to the mast, effectively folding the sail in two and reducing the sail area by about 50%. Especially handy if you are alone. The peak halyard line should be ready to run when the halyard is uncleated. On my Bay Hen, I store my halyards coiled and hung on their respective cleats. To get one ready to run, I would remove it from it's cleat and toss the coil carefully into the cabin, to keep it out from under foot and give it some distance to run before it got to my hand to give the usual kinks time to untwist. The peak halyard is then uncleated and the gaff peak is lowered down smartly against the mast. As soon as possible, a slight tension should then be place on the peak halyard to keep it from flopping around too much, and it should be secured again. If you plan to use this technique assure that the lazy jacks are adjusted so that the boom does not hit the gallows. I always keep my lazy jacks adjusted so that my boom clears boom gallows when I lower sail, yet with a pull of the sheet, the boom will come to rest on the gallows. Check this adjustment often, because if the boom gets stuck as it crosses the gallows, the sail will take the full strength of the wind and you may capsize. |
|
On a single reefed Bay Hen do
not tie the nettles of the most forward reef point. The sail looks good
enough without it and you can shake out the reef from the companionway
without going forward. 6.4.1.4 Reefing of Hen's Sprit Rig The Hen sprit rig is reefed by using brailing lines that are attached to a long singular line which runs almost the length of the mast. The brail lines are then run through reefing grommets from the luff of the sail out to grommets on the main body of the sail and back to the luff. To reef the sail you simply loosen the snotter and pull down on the long singular line. This pulls the sail towards the mast, picture the concept of window blinds, reducing the sail area from 150 sq. feet to 85 sq. ft. To shake out the reef you simply slacken the snotter, uncleat the brailing line, letting it run free and tighten the snotter. All of this is much easier to do than to explain. Some sprit rigs have conventional reefing point while several use a roller furling system where the snotter is eased and a roller pendent is pulled to reef the sail, all from the cockpit! 6.4.2 Raising and Striking Sail In heavy seas and wind special care is required when raising or striking sail. Without forward motion the boat will soon be blown broadside to the wind and waves. This is uncomfortable at best and at worst the boat is subject to capsize. Another danger is the surprising speed at which the boat drifts sideways raising the possibility of coming up against a nasty shore. When there is crew, the use of the engine to keep the boat into the wind can avoid these problems. The solo crew must plan ahead and think through how to deal with such conditions by seeking sheltered waters, or by finding ways to use the engine while working the sails. Oh to have four long arms when going solo! 6.4.3 Going to Windward Beating to windward during a strong blow feels much as the term implies "beating!" You, your crew, and your boat will feel the direct and full assault of wind and waves, and real effort must be maintained to keep the boat under control and on her selected course. Remember to move yourself and all crew to the high side to help balance the boat against the forces. Consider additional ballast such as 5 gallon Jerry cans filled with water. Gusts will tend to swing her windward, and that is good, since the result is usually the "spilling" of some air which helps keep the boat upright! If the wind picks up and the boat begins to heel uncomfortably, you will most likely also feel a strain on the tiller as you try to hold course. Cat rigged boats are notorious for having strong "weather helm" in moderate to strong winds and the remedy is to "heave to" , or head for a protected cove and reef that sail before continuing on. Hen boats are designed to sail relatively flat on the water, not heeled over like soft chined sloops. You will notice that she will actually sail faster (and certainly under better control) with the sail set at a sensible reef and the lee rail well up from the water. Reefing as the wind is blowing is never an easy matter. Make sure all reefing lines and equipment have been put in place ready to go before you set out. Secure your "stuff" as completely as possible. You will be amazed at the amount of flotsam you can release during a knockdown! Close all hatches and openings and try to anticipate wind changes ahead of time so that you can reef early, before things get really difficult. After all, if the wind mellows, you can always untie the reef under more favorable circumstances since you cease to be dashed about! Centerboard, Bildgeboard, Leeboard Adjustments: When beating, or on a close reach in gusty winds, the pressure on the centerboard is enormous. When you are hit by a gust, the boat tends to suddenly heel and threatens to capsize not only because of the when pressure on the sail, but also because of the centerboard pressure which is helping to trip the boat over. By raising the board some, perhaps a quarter to a third, when the wind increases, you will make more leeway allowing the boat to "skid" sideways instead of tripping on the board, reducing the heeling moment. You'll have to determine how much to raise the board, as each boat is different. If you have bildgeboards or leeboards consider using the windward board in gusty conditions. The newer Bay Hens, Dovekies, and Sea Pearls should consider this. As the boat heals, less board is in the water, reducing the tripping force Such board adjustments should be considered a temporary measure until the boat can be gotten to a protected area for reefing. When the board is raised on the Bay Hen the center of lateral resistance is also brought somewhat aft reducing weather helm. In those instances when you are caught out in unexpected heavy weather on a beat or reach, you may, for a short time, "spill air" as seems prudent by easing the sheet and allowing the upper section of the sail to luff. This is called using a "fishermen's reef." It permits the boat to remain upright but places extra stress on the sail, and the procedure should be used for short periods only. But, do use this technique when the safety of the boat and crew is at risk. Heading up with careful tiller adjustments during strong puffs also accomplishes much the same thing, and if conditions allow, slackening the peak of a gaff sail can also help depower the boat. By all means wear your PFD and hang on to that sheet with your hands, not cleated as is most often the case in light air. Some sailors favor wearing a harness with a line and carabiner to attach the crew to the boat. Should the boat capsize, it could easily drift way before the occupant(s) can get a hold onto it. Then again with such an emergency line there is the risk that such a line could serve to entangle the crew. 6.4.4 Reaching While reaching in heavy weather, keep a constant eye to windward for signs of increasing wind strength. Upcoming "puffs" are usually first noticed by heightened water disturbance, or by the wind's effect on neighboring vessels. As necessary, luff the sail by easing the sheet, but keep her moving, otherwise all rudder control will be gone! Hold the sheet with your hands, uncleated and tidy, ready to run free during unexpected gusts. Immediate and complete flexibility is needed to trim sail and to deal with wind strength and direction changes. Raising the centerboard slightly on some boats moves the center of lateral resistance aft and helps improve weather helm. But if there is any doubt about control, turn into the wind and drop all sail, or quickly find a spot that allows for immediate reefing. 6.4.5 Running Whenever possible, try to stay off of a dead run. With strong winds and usually a following sea, control is greatly jeopardized. Do not sail "by the lee." Should the rudder rise above the water, the boat will swing uncontrollably broadside with often disastrous results (read knockdown). When on a run or broad reach in heavy weather, don't allow the boom to swing out too far, and keep the crew weight towards the center of the boat. In general, weight should be moved forward while beating and brought aft while running. It is best to keep the boat off of a dead run during blustery conditions because there is a good chance for an accidental jibe. An unintended jibe risks not only the safety of the crew but it puts tremendous force on the sail, rigging, and spars. You can help avoid these dangerous moments by steering carefully, but decidedly, off of a dead run. Following waves can easily throw a boat off course and set up conditions for an accidental jibe! When the wind blows hard enough to require a second reef, open water also develops quite a chop. Sailing becomes extremely difficult and labored, especially to windward, and it is time to make way with haste to the nearest protected area. Hen boats are not designed to be sailed by hiking out like the crews of catamarans and small performance dinghies enjoy. Likewise, avoid sailing near the lee shore. A lee shore forces you to sail close hauled, the most stressful direction for you and your boat, to escape the dangerous shallows. You need a route with open water to leeward so that, if you must drop your sail and drift, you will have a large area free from peril. When the weather gets uncomfortably strong, use your engine (if you have one and it will start). Steer into the wind, drop the sail, then head for shelter! 6.4.6 Coming About Remember to give the commands to ready your crew and execute the new tack. It is extremely important that all hands know exactly when you will be coming about. You and your crew must synchronize movement to coincide with the crossing of the boat's boom. Push the tiller leeward, and, as the boat turns windward, the crew must shift first to the center, than continue on to the opposite side to balance the boat with the wind now coming from the other direction. Instruct all not to change position suddenly or prematurely, for too much weight may be placed on the wrong side (leeward) with possibly disastrous results (read knockdown!) As the winds and waves increase, you can easily find yourself "in irons" while coming about. The sail whips and flutters noisily, you are dead in the water, and have absolutely no rudder control. The boat has stalled, but then begins drifting backwards. To remedy the situation, put the tiller over to the side you wish the bow to go. If the boat does not respond then force the boom over to the same side as the tiller. As the bow moves away from the wind let the sail go and allow it to fill. Give the boat a chance to gain momentum, adjust the sheet and rudder, and get under way on your new course. On some boats it can be helpful (perhaps necessary) to raise the centerboard. In a gaff rigged boat, assure that the lazy jacks have been adjusted so that the boom does not hit the gallows. Check this adjustment often, because if the boom gets stuck as it crosses the gallows, the sail will take the full strength of the wind and you may capsize. This adjustment can be made so that when you strike sail, and pull the boom in, it will come to rest on the gallows with a little tension on the sheet. 6.4.7 Jibing Section 6.3.6 discussed jibing in light air. But you must think carefully about executing a jibe in stronger winds and follow these steps only if you are well prepared and you know you will have full control of the boat through the entire jibing maneuver: 1. Warn all crew by calling out "prepare to jibe"; the crew should be trained to keep heads (and other body parts) down and shift to the opposite side of the boat at the appropriate time. 2. Assure the wind is dead aft or slightly over the side opposite the sail. 3. Pull in the sheet until the boom is almost overhead, carefully flaking the sheet in preparation for its release on the opposite tack. 4. Maintain rudder control to keep a safe heading. 5. Keep the sheet taut, call out "jibe ho" and ease the tiller away from the boom until the wind catches the opposite side of the sail. 6. Immediately engage the rudder to force the boat to hold a nearly downwind course. 7. Adjust the sheet, releasing it quickly, but steadily, on the new tack. It is important to restrain the boat from swinging too far off as the sail is brought over. If wind forces are not compensated for, there can be serious results (read knockdown!). If the sail is not reefed sufficiently for a safe jibe consider a 270 degree maneuver where you actually first point upwind and come about before going downwind on the new tack. 6.4.8 Preventing a Knockdown One memorable capsize was witnessed on the Miles River near St. Michaels on the Eastern Shore of the Chesapeake Bay. It was a very windy day and a log canoe race was about to begin. Log canoes are large boats built for speed. They have enormous sails and require the crew to hike out on long hiking boards. The starting gun sounded and the canoe captains jumped in the water and swam towards their boats. A unique way to start a sailboat race! As the captains approached their boats, the crews were frantically getting their boats underway, timed of course, to ensure pick up of their respective captains. Soon the boats were underway and bearing down on the onlooker's position which was just outside the harbor. The sight was magnificent. The narrow, fast, boats of 30 to 45 feet in length were already well heeled over, even in the relative protection of the harbor. Some were carrying full sail, a large club footed main, a nearly identical mizzen, and a large jib. Others had only the jib and mizzen up, the smart ones! As the boats neared the mouth of the harbor, they began feeling the full force of the wind and crew members started moving out on the long hiking boards to counter the wind's force on the enormous sail area. Ken Murphy, who witnessed the event, said, "One boat with full sails came right up close to us. It hissed through the water, sails so large they blotted out all of St. Michaels, the two 50 foot unstayed masts bending in the wind. The heaviest crew members were fully hiked out on the boards, when the full strength of the wind took the whole thing over, the masts and sails crashing into the water and the crew abandoning ship. I was trying my best to take all of this in, knowing full well it was a once in a lifetime event. The last few seconds of the capsize went like slow motion. The crew's vain attempt to counteract the wind's force, the wind gripping the boat and bringing it down, the crew's resignation as they were dumped in the cold spring water. But, what caught my eye, as a special delight, was the actions of the helmsman/captain. As the boat went over, she stepped up quickly, perfectly balanced, and got up on the side of the boat staying nice and dry and giving orders to the soaked crewman as they began to remove the two enormous masts in preparation for a tow. As she gave the orders, her left hand was busy directing this way and that while her right daintily kept hold of a can of beer." You really don't want to capsize. It's a mess and can be dangerous especially if you plunge into cold water. One exception would be as a drill where you have others standing by to assist you and the boat is emptied of all valuables while you are sailing in heavy winds just to practice and learn your boat's limitations and how to deal with strong weather. The previous subsections of "Sailing in Heavy Air" need to be fully considered and the skills practiced. The following, though some what redundant, discusses further the actions needed to prevent a knockdown. An important thing to remember is that SWS boats were never intended to be ocean going vessels. They were intended to be used in protected waters to explore "where the water meets the shore". SWS boats are basically "warm water boats" and are perfect for what they were intended to be, camp cruisers. They are quite stable boats, but they do have their limitations. 6.4.8.1 Keeping a Weather Eye and Reefing Early Learn to judge the wind before raising anchor. Many anchorages are protected from the wind and so you need to develop a sixth sense to judge the unprotected wind and wave conditions and to factor in the weather forecasts. Reefing in the quiet of the anchorage is far better than struggling to reef in wind and waves. Review your planned route and if heavy air is expected modify the route to minimize fetch. You also want to avoid a lee shore. Always try to keep a good distance from such a shore. If anything happens that stops your progress you might find yourself being blown up to that shore with possible damage to the boat and yourself. With enough distance from the lee shore you will have time to get the boat back sailing or get an anchor out and set. 6.4.8.2. Dealing With the Puffs Keep the main sheet uncleated and the sheet free in the case you need to quickly release it in a heavy puff. When going to windward keep the boat as high as possible where a slight course adjustment toward the wind will begin depowering the upper section of the sail. Raise the centerboard somewhat as discussed in the last section. 6.4.8.3 Ballast, Both Static and Dynamic A practiced crew (dynamic ballast) will move about the boat to maximize the use of their own weights to keep the boat as level as possible. The addition of "static" ballast is a possibility in our SWS boats, especially when single handing. The use of well placed five gallon water containers are welcome to add a little ballast. Some SWS members have added lead ballast. 6.4.8.4. Dangers of Downwind Sailing At first it might be surprising to know most knockdowns of SWS trailerable boats occur while the boat is going downwind. A strong puff can overpower the boat's rudder control, sending it broad side to the wind with the wind driving the boat down. It is for this reason that reefing conservatively when faced with a downwind leg in heavy air is strongly recommended. In fact, you should over reef because in a heavy wind a small amount of sail is all you need to get the boat up to hull speed. So there is little change in the speed, but a great change in the stress on the rigging (and crew). |
6.5 Sail Alternatives |